How to Make a Garland
If you want to do just one more little thing to put your home over the top for Christmastime, I think you should make a garland.
OK when I say that, most people are intimidated but there’s no need! It’s easier than you think. You probably already have everything on hand right now.
In no time at all, you can make your home into a Currier and Ives Christmas masterpiece
Here’s how to do it.
Tools You Will Need
I’ll bet you already have tools on hand. If not, they are all common things and easy to find. Paddle wire is the most likely thing you might be missing. It’s inexpensive, and you can order it from Amazon or pick it up in the floral department at Michaels or any craft store.
Believe me, it’s something you’ll want to have around once you get how you can use it.
Here’s what you’ll need:
22 gauge wire that comes on a spool or a cardboard paddle
a snip to cut wire - don’t use your foliage snip (I know it’s tempting because I’ve done it) it will ruin your snips
twine or any kind of flexible base for your garland
a snip to trim your foliage

Step 1: prepare your base
Cut your twine to the length you want for your finished garland. I usually give myself a little extra just in case. You can always cut it shorter, but it’s harder to make longer.
Remember it will be heavier once you add the foliage so you need enough slack to get it to drape. I actually hang my twine up where I want to put my garland just to test it.
Tie a loop on each end. You’ll use the loops to hang the garland from your support.

Step 2: Secure your wire
Secure your paddle wire to the twine.
I thread mine through the loop knot and twist it firmly

Step 3 Gather and prep your materials
Forage greens and interesting bits of nature from your own back yard.
If you haven’t put your tree up yet, the branches you trim from the bottom make a fabulous garland or little wreaths.
Think a bit about where the garland will be placed as you decide on materials. If people will be seeing it close up, you can add a lot more detail. If it is on a roofline or up high someplace, just some greens alone will be lovely.
If your garland is indoors, you can include fragile pieces like dried flowers or silk ribbons. If it is outdoors, stick to things that will hold up.
Beyond greens, you can incorporate almost anything. I love to tie in bracken from ferns around the farm, bright red dogwood twigs, rose hips, almost anything really.
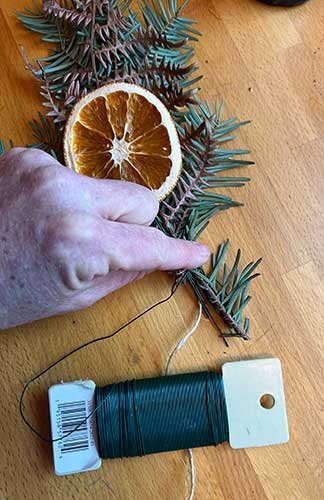
You don’t even have to limit yourself to things with stems. You can just make a stem out of wire for bulkier bits like dried citrus slices or pinecones.

Home made “stems” to make it easy to incorporate textural interest.
Step 4 make a bunch
Snip bits of greens, gather your accent items and make a little bunch like a tiny bouquet.
Lay the bunch on the twine on the end where you tied the wire, silghtly covering the loop. Point the stem end toward the middle of the twine.
Loop the paddle wire around the stem end, wiring it securely to the twine.

Step 5 Keep going to the middle
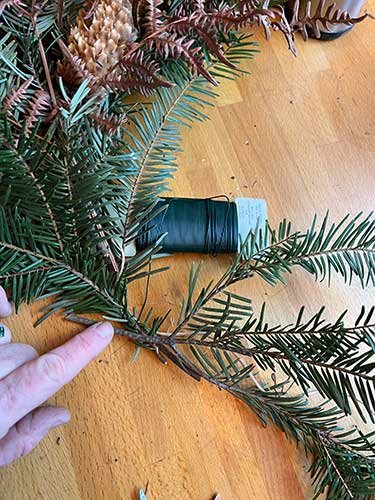
Make another bunch. Lay it over the first one to cover the wired stems and repeat the process.
Continue adding bunches until you get to the center of the twine.
At this point, tie everything off tightly and cut the wire.

Step 6 Switch directions
Now we simply reverse directions.
Start the exact same process by tying your paddle wire to the opposite loop. Wire on your bunches until you meet in the middle.
I’ve made it to the middle where bunches from each direction come together
At this point you’ll need to tuck stems in carefully at the point where the foliage joins so they are not exposed. You can always wire in pine cones or other elements to hide the joint

I snugged the stem ends into foliage coming from the other direction, secured them firmly and hid my wire. Hold the garland up at this point. It might look great. If you don’t like the “pinch point” where the two directions meet, you can always wire in more material to smooth the transition.
Step 7 Fa La La!
Now you can use your loop ends to attach the garland to your house or fireplace mantle or stairs.. the possibilities are endless. I just put some nails up on our covered porch for this garland. But you can use command hooks or any fastener. If you are putting the garland on a staircase balcony, you can even wire it to the structure.
If your garland is long, you’ll need a few nails or hooks to support in a few places in the middle
After you hang it. You might find a few loose bits. Just use your wire to tie it on firmly and you’re good to go.

I added a hanging swag of greens on each post to add some dimensionality to this swag.
Have fun!