Principles of Floral Design: Negative Space
When we first start working with flowers, all of our attention is on the blooms. Seriously, who are we kidding, they’re gorgeous. So that’s what we’re looking at.
Today I’d like to invite you to consider flowers a little differently to level up your designs. As part of my series on the Principles of Floral Design, let’s talk about negative space (also sometimes called negative shape).
What is Negative Space/Shape?
A floral design has a composition to it just like a painting or a sculpture. When artists are arranging a composition, they don’t just consider the shapes and forms of their subjects, but they think about the spaces between those shapes and forms just as carefully.
Negative space is the empty space between your forms. It’s the hole in the doughnut. In your floral work, those empty spaces form their own shapes and patterns that are every bit as much of your design as the flowers themselves.
To help you see it, here’s an example from a little horse figurine in my office. I took a picture and did a quick little sketch just looking at the negative shapes in the photo - and not the horse itself.
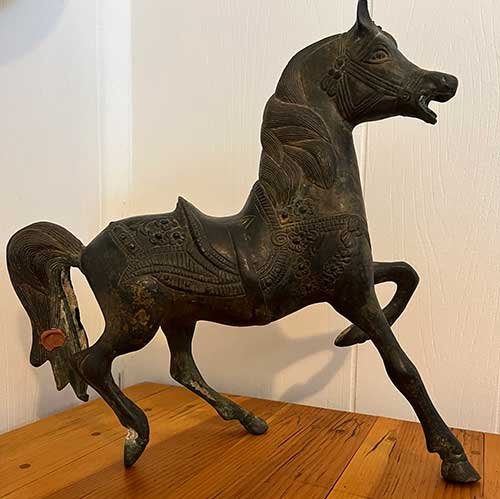
When you look at this horse sculpture, can you focus your eyes on the white shapes in between and around the horse instead of the sculpture itself? Can you appreciate that those shapes are lively, dynamic, and make the sculpture more interesting?

I took a quick minute to look at the spaces around horse and drew some of the negative shapes so you can see them more clearly. Making sketches like this yourself will help train your eye to see and appreciate negative shape.
When we only focus on flowers as we are designing, it is intuitive to want to pack in any open spaces and make a solid mass that is all flowers. That’s natural. Every now and then, it’s exactly what we want.

This little arrangement of anemones and peonies forms a round mass that mimics the shape of the peony blooms. It doesn’t use any open space. Forming a round pompon (just like a peony) was the whole point of this design.
You can see that massing the flowers together doesn’t create much of a sense of movement and the arrangement appears really solid. It also reads as a single form so the detail of individual blooms don’t stand out.
But, when you pay attention to the spaces in between, you can begin to infuse your design with life and movement that enhances the vibrancy of the flowers.

This arrangement leaves a lot of open space between wispy stems to create a lot of movement and a delicacy. If every open space was packed with flowers, you’d lose all of the elements that make this design work.
The spaces in between also call attention to the detail of each individual bloom. See how you can zoom in and appreciate the uniqueness of each one. Whereas the arrangement above reads like one single shape and you are not inclined to appreciate each flower.
How to prepare yourself to use negative space in your designs
Looking at negative space is probably a new idea. You may not have considered it before and learning to work with it will take practice. Begin by looking at negative space around you throughout your day so you can get used to seeing it and flipping your vision back and forth between negative and positive shapes in your every day environment.
Try drawing something you are observing by only drawing the negative shapes and ignoring the subject.
Pause while you are arranging flowers to appreciate the spaces in between and see how they are enhancing your design and the vibe you might be going for.
Techniques for using negative space with flowers
Technique 1 - layer upward
A layering approach is fun when you have blooms on long delicate stems such as cosmos or Icelandic poppies.
Begin by placing your bigger, heavier, focal blooms low in the design and close to the vase. Focal flowers can include dahlias, roses, mums, or peonies just for example. You can pack blooms a little closer in this layer because we want to create a stable base for the overall design.
Once you’ve established that base, thread in your longer stemmed blooms so that they can dance and float above the mass you’ve created. Don’t be afraid to leave a gap between the lower and upper layers - use that open space to your advantage. It will enhance the delicacy and movement of your longer stemmed flowers and create a much more exciting design than if you packed everything close together.

Leaving space between the two flower layers allows the natural movement and delicacy of the pink cosmos to enhance this design.
Technique 2- U shape
Leaving an open space smack in the middle of an arrangement is an on-trend technique that is very popular right now.
Begin by using your longer stems to create strong diagonal lines on either side of your container. Layer a base of flowers at the bottom, then fill in along the lines you established until you have flowers arranged in a strong U shape with a gap in the center.
When you first try this technique, it’s going to feel weird. Go ahead. Feel weird and do it anyway. It takes some practice when we’re used just filling the whole vase. Don’t worry if you have to take the whole thing apart and re-do it a few times. It gets easier.
I encourage you to give it a try because you’ll be able to make a sophisticated design that will elevate your flowers in a new way. And trying this shape will give you an appreciation for using open spaces deliberately.
Technique 3 Wildflower Vibes
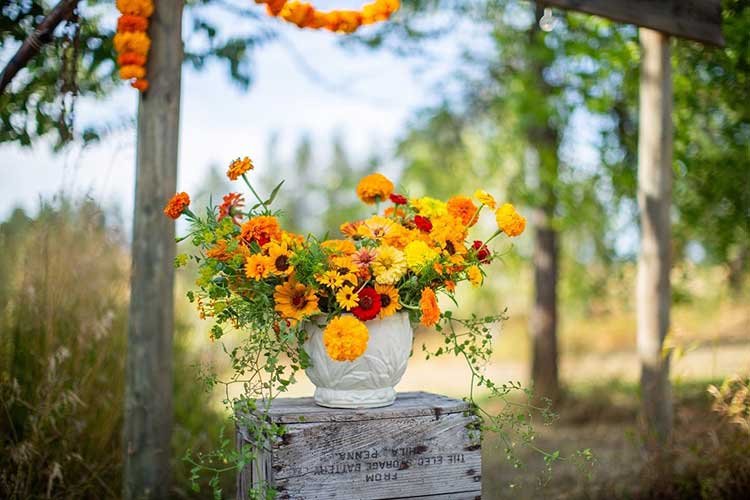
My mother was a master floral forager back in the day. When my folks hosted dinner parties, she always made gorgeous arrangements both from her garden and from what she found growing around our rural home. At the height of summer, she’d cut wild Queen Anne’s Lace and big thistles (weeds in the eyes of our farmer neighbors) and make massive arrangements that looked like stunning summer meadows.
She didn’t have any formal art training, but instinctively knew that the key to getting that wildflower vibe was lots of open space between the blooms. She arranged them the way they grew in nature.

Getting that summer meadow vibe requires using blooms that already have lots of air and space in their structure and leaving plenty of space between them in your arrangement. In this case, less really is more.
Are you ready to try?
Leaving those open gaps can feel a little weird if you haven’t done it before. But I encourage you to resist the urge to pack every available space with more flowers.
Leave it open and see what happens.
Share your work! Shoot me an email with pictures. I love to see what you do.